
Install Pterodactyl on a Linux VPS server
Pterodactyl (also see its official GitHub repository) is an open source game server management panel built around two separate components: the Panel, which provides the web administration interface, and Wings, which runs services on the node through Docker. If you want to deploy it on a VPS server, you need to prepare Linux, the database, the web server, and then connect the node to the panel.
This guide was tested on a Ubuntu 24.04.4 LTS VPS, with Pterodactyl Panel 1.12.4 and Wings 1.12.3. The commands below stay close to the official documentation, but add the practical checks that are often discovered only during the installation.
What you will have at the end
At the end of the installation, you will have:
- a Pterodactyl Panel accessible from the web.
- a first administrator account.
- a working queue service.
- a Wings Node connected to the panel.
- IP and port allocations ready to use.
Here is the administration interface after the Panel is installed:

Prerequisites before you start
Before installing anything, check the following points:
- you have root access to your VPS.
- you are using a compatible Linux distribution, such as Ubuntu 22.04, Ubuntu 24.04, Debian 11, Debian 12, or Debian 13.
- your environment supports Docker.
- you are not on an OpenVZ or LXC environment that is incompatible with Docker.
- you have a domain name for the panel, and ideally a separate subdomain for the Wings node.
For Wings, the critical point is Docker compatibility. If your virtualization layer does not properly support containers, the node will not work normally.
You can check the virtualization with:
systemd-detect-virt
On a KVM VPS, the command can return for example:
kvm
If you need to install Docker on your machine before going further, we recommend following our dedicated guide: Install Docker on Linux, a practical getting-started guide.
Step 1: install the Panel dependencies
The Pterodactyl Panel notably requires:
- PHP 8.2 or 8.3.
- MariaDB or MySQL.
- Redis.
- NGINX or another web server.
- Composer v2.
- curl, tar, unzip, git, and lsb-release.
The example below targets an Ubuntu base with NGINX, MariaDB, Redis, and PHP 8.3. On Debian, adapt the PHP repositories instead of using the Ubuntu PPA.
apt update
apt -y install software-properties-common curl apt-transport-https ca-certificates gnupg lsb-release
LC_ALL=C.UTF-8 add-apt-repository -y ppa:ondrej/php
curl -fsSL https://packages.redis.io/gpg | gpg --dearmor -o /usr/share/keyrings/redis-archive-keyring.gpg
echo "deb [signed-by=/usr/share/keyrings/redis-archive-keyring.gpg] https://packages.redis.io/deb $(lsb_release -cs) main" | tee /etc/apt/sources.list.d/redis.list
apt update
apt -y install php8.3 php8.3-common php8.3-cli php8.3-gd php8.3-mysql php8.3-mbstring php8.3-bcmath php8.3-xml php8.3-fpm php8.3-curl php8.3-zip mariadb-server nginx tar unzip git redis-server
Then install Composer:
curl -sS https://getcomposer.org/installer | php -- --install-dir=/usr/local/bin --filename=composer
If you run Composer as root, some commands may display an interactive warning. For the Panel installation, use COMPOSER_ALLOW_SUPERUSER=1 as shown below.
Step 2: download the Panel files
Create the installation directory, move into it, and download the panel files.
mkdir -p /var/www/pterodactyl
cd /var/www/pterodactyl
curl -Lo panel.tar.gz https://github.com/pterodactyl/panel/releases/latest/download/panel.tar.gz
tar -xzvf panel.tar.gz
chmod -R 755 storage/* bootstrap/cache/
Step 3: prepare the database
The panel needs a dedicated database and a user with the required permissions. Choose a strong password and keep it, because it will be requested during environment configuration.
Connect to MariaDB:
mariadb -u root -p
Then, in the SQL console:
CREATE USER 'pterodactyl'@'127.0.0.1' IDENTIFIED BY 'yourStrongPassword';
CREATE DATABASE panel;
GRANT ALL PRIVILEGES ON panel.* TO 'pterodactyl'@'127.0.0.1' WITH GRANT OPTION;
exit
Use 127.0.0.1 rather than localhost to avoid MySQL socket issues when the Panel connects to the database.
Step 4: configure the Pterodactyl Panel
Copy the environment file, install the project’s PHP dependencies, then generate the application key.
cd /var/www/pterodactyl
cp .env.example .env
COMPOSER_ALLOW_SUPERUSER=1 composer install --no-dev --optimize-autoloader
php artisan key:generate --force
Then run the interactive configuration:
php artisan p:environment:setup
php artisan p:environment:database
php artisan p:environment:mail
Important points during these assistants:
- the panel URL must start with
https://orhttp://. - use
127.0.0.1as the MariaDB host if the database is local. - Redis is recommended for the queue.
- if you do not have SMTP yet, temporarily configure the mailer in log mode or come back later with a real mail configuration.
Then initialize the database:
php artisan migrate --seed --force
Finally, create the first administrator account:
php artisan p:user:make
Back up the APP_KEY
The APP_KEY variable is essential. It is used to encrypt sensitive panel data. If you lose it, encrypted data cannot be restored correctly.
To display it:
grep APP_KEY /var/www/pterodactyl/.env
Keep this value in a secure location outside the server, along with a backup of your .env file.
Step 5: apply the correct permissions
On a Linux system with NGINX, apply ownership to the correct web user:
chown -R www-data:www-data /var/www/pterodactyl
Step 6: configure the NGINX web server
To make the panel accessible, you need to configure NGINX and install an SSL certificate with Certbot. In production, make sure a domain name already points to the VPS IP before requesting the certificate.
- Install Certbot and its NGINX plugin:
apt update
apt -y install certbot python3-certbot-nginx
- Generate the SSL certificate for your domain name, replacing
panel.example.comwith your real subdomain:
certbot certonly --nginx -d panel.example.com
- Then create the NGINX configuration file
/etc/nginx/sites-available/pterodactyl.conf:
server {
    listen 80;
    server_name panel.example.com;
    return 301 https://$server_name$request_uri;
}

server {
    listen 443 ssl http2;
    server_name panel.example.com;

    root /var/www/pterodactyl/public;
    index index.php;

    access_log /var/log/nginx/pterodactyl.app-access.log;
    error_log /var/log/nginx/pterodactyl.app-error.log error;

    client_max_body_size 100m;
    client_body_timeout 120s;
    sendfile off;

    ssl_certificate /etc/letsencrypt/live/panel.example.com/fullchain.pem;
    ssl_certificate_key /etc/letsencrypt/live/panel.example.com/privkey.pem;

    ssl_session_cache shared:SSL:10m;
    ssl_protocols TLSv1.2 TLSv1.3;
    ssl_ciphers "ECDHE-ECDSA-AES128-GCM-SHA256:ECDHE-RSA-AES128-GCM-SHA256:ECDHE-ECDSA-AES256-GCM-SHA384:ECDHE-RSA-AES256-GCM-SHA384:ECDHE-ECDSA-CHACHA20-POLY1305:ECDHE-RSA-CHACHA20-POLY1305:DHE-RSA-AES128-GCM-SHA256:DHE-RSA-AES256-GCM-SHA384";
    ssl_prefer_server_ciphers on;

    location / {
        try_files $uri $uri/ /index.php?$query_string;
    }

    location ~ \.php$ {
        fastcgi_split_path_info ^(.+\.php)(/.+)$;
        fastcgi_pass unix:/run/php/php8.3-fpm.sock;
        fastcgi_index index.php;
        include fastcgi_params;
        fastcgi_param PHP_VALUE "upload_max_filesize = 100M \n post_max_size=100M";
        fastcgi_param SCRIPT_FILENAME $document_root$fastcgi_script_name;
        fastcgi_param HTTP_PROXY "";
        fastcgi_intercept_errors off;
        fastcgi_buffer_size 16k;
        fastcgi_buffers 4 16k;
        fastcgi_connect_timeout 300;
        fastcgi_send_timeout 300;
        fastcgi_read_timeout 300;
    }

    location ~ /\.ht {
        deny all;
    }
}
If you use a PHP version other than 8.3, adapt the php8.3-fpm.sock path.
- Enable the configuration by creating the symbolic link, remove the default NGINX configuration if it exists, then validate and restart NGINX:
ln -s /etc/nginx/sites-available/pterodactyl.conf /etc/nginx/sites-enabled/pterodactyl.conf
rm -f /etc/nginx/sites-enabled/default
nginx -t
systemctl restart nginx
After this step, open your domain in the browser and log in with the administrator account created earlier.
Step 7: enable cron and the queue
Pterodactyl relies on a scheduler and a queue for background tasks.
Add the cron task:
(crontab -l 2>/dev/null; echo "* * * * * php /var/www/pterodactyl/artisan schedule:run >> /dev/null 2>&1") | crontab -
Then create the queue systemd service in /etc/systemd/system/pteroq.service with this content:
cat <<'EOF' > /etc/systemd/system/pteroq.service
[Unit]
Description=Pterodactyl Queue Worker
After=redis-server.service

[Service]
User=www-data
Group=www-data
Restart=always
ExecStart=/usr/bin/php /var/www/pterodactyl/artisan queue:work --queue=high,standard,low --sleep=3 --tries=3
StartLimitInterval=180
StartLimitBurst=30
RestartSec=5s

[Install]
WantedBy=multi-user.target
EOF
Then enable Redis and the worker:
systemctl enable --now redis-server
systemctl daemon-reload
systemctl enable --now pteroq.service
systemctl status pteroq.service --no-pager
Step 8: install Docker for Wings
Wings relies on Docker. Start by installing Docker, then enable the service at boot.
On a fresh machine, use this sequence to remove obsolete packages and install the latest stable version of Docker Engine:
sudo apt remove $(dpkg --get-selections docker.io docker-compose docker-compose-v2 docker-doc podman-docker containerd runc | cut -f1)
curl -fsSL https://get.docker.com -o get-docker.sh
sudo sh get-docker.sh
systemctl enable --now docker
docker version
If Docker is already used in production on the VPS, do not remove existing packages without a maintenance window. In that case, first check the installed version and the impact on your existing containers.
On Linux kernels older than 6.1, enabling swap accounting can also be useful to avoid some memory issues in containers.
Step 9: install Wings on the Linux node
Create the configuration directory and download the Wings binary.
mkdir -p /etc/pterodactyl
curl -L -o /usr/local/bin/wings "https://github.com/pterodactyl/wings/releases/latest/download/wings_linux_$([[ "$(uname -m)" == "x86_64" ]] && echo "amd64" || echo "arm64")"
chmod u+x /usr/local/bin/wings
wings version
Step 10: create the Node in the Panel
Once the panel is working, go to Admin > Nodes > Create New. Fill in the node name, location, FQDN, memory and disk limits, and Wings ports.
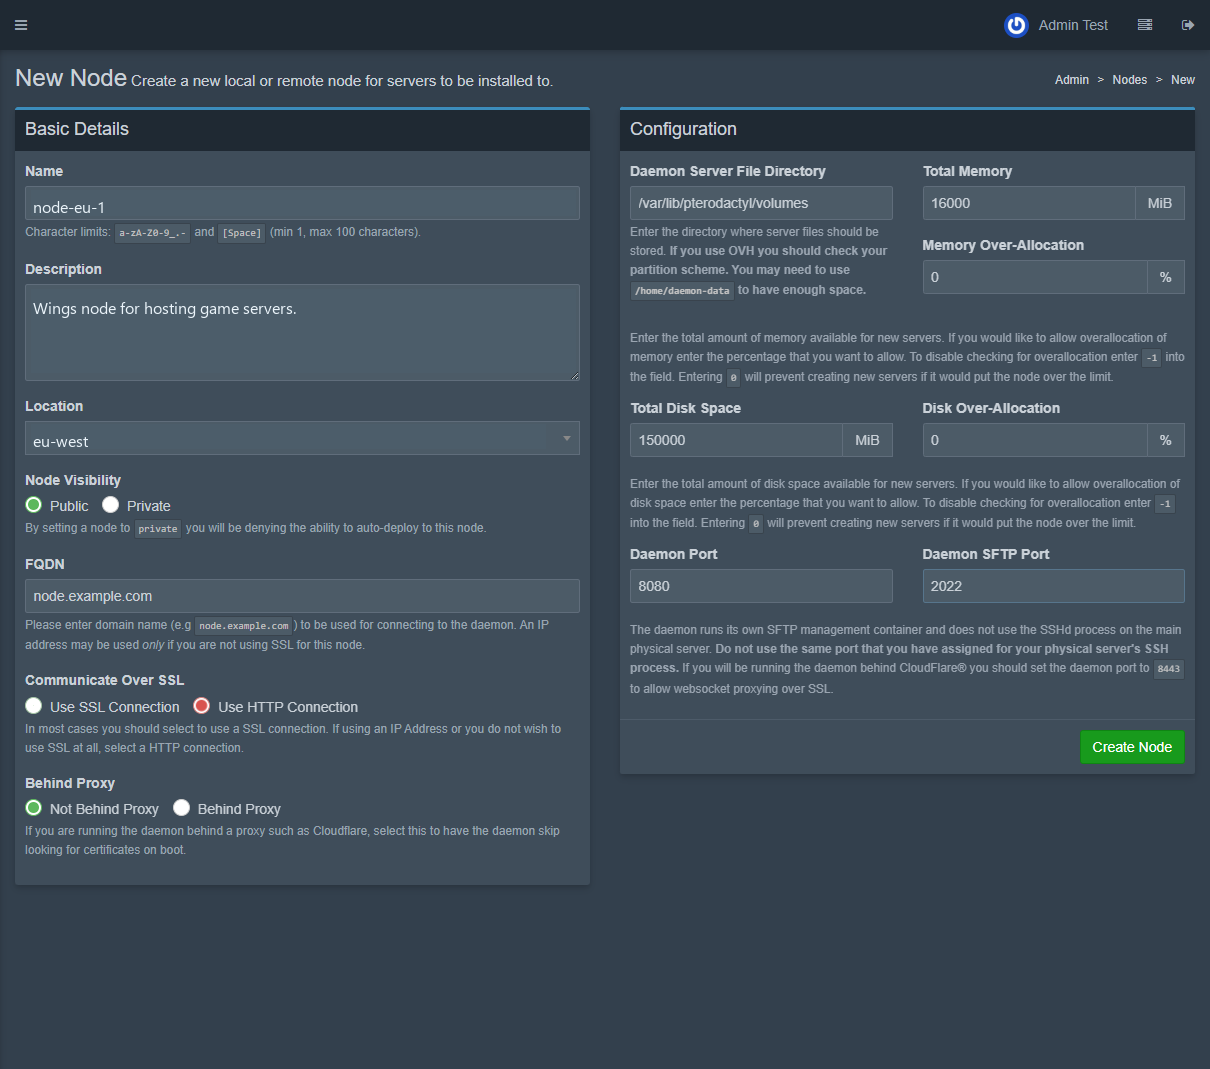
Some simple rules:
- use a real FQDN for the node, for example
node.example.com. - choose Use SSL Connection if Wings has a valid certificate for this FQDN.
- choose Use HTTP Connection only for a temporary test or an isolated environment.
- keep
8080for the Wings API and2022for SFTP, unless you have a specific need. - do not use
127.0.0.1in game server allocations.
After creating the node, open the Configuration tab. The panel generates the full config.yml content to copy into /etc/pterodactyl/config.yml.

Then create the file on the server:
nano /etc/pterodactyl/config.yml
Paste the content provided by the panel, save it, then test Wings in debug mode:
wings --debug
If startup is correct, you should see Wings contact the Panel API, process the server list, then listen on the API port and SFTP port. You can then stop debug mode with Ctrl+C and move to the systemd service.
Step 11: run Wings as a systemd service
Create the /etc/systemd/system/wings.service service:
cat <<'EOF' > /etc/systemd/system/wings.service
[Unit]
Description=Pterodactyl Wings Daemon
After=docker.service
Requires=docker.service
PartOf=docker.service

[Service]
User=root
WorkingDirectory=/etc/pterodactyl
LimitNOFILE=4096
PIDFile=/var/run/wings/daemon.pid
ExecStart=/usr/local/bin/wings
Restart=on-failure
StartLimitInterval=180
StartLimitBurst=30
RestartSec=5s

[Install]
WantedBy=multi-user.target
EOF
Then enable the service:
systemctl daemon-reload
systemctl enable --now wings
systemctl status wings --no-pager
You can also check the listening ports:
ss -ltnp | grep -E ':(8080|2022) '
Step 12: add IP and port allocations
Each service created on the node needs at least one allocation, meaning an IP + port combination. In the node administration area, add the required port ranges with the correct IP address from your network interface or the public IP of the VPS.
To retrieve the main server IP:
hostname -I | awk '{print $1}'
To check the public IP seen from the Internet:
curl -fsS https://api.ipify.org
Do not use 127.0.0.1 for allocations. Here is an example of allocations created in the interface, with a masked documentation IP:

Step 13: configure the firewall
For the Panel, Wings, and your game servers to communicate and be reachable from outside, you must configure the firewall on your VPS.
Pterodactyl generally uses the following ports:
- 80 and 443 in TCP for Panel web access.
- 8080 in TCP for the Wings API used by the Panel.
- 2022 in TCP for the SFTP server embedded in Wings.
- your game server ports, for example 25565 in TCP/UDP for Minecraft.
Option A: configuration with UFW
Before enabling UFW, always check its current state to avoid cutting off your SSH access:
ufw status
Allow SSH first, then open the required ports:
ufw allow 22/tcp
ufw allow 80/tcp
ufw allow 443/tcp
ufw allow 8080/tcp
ufw allow 2022/tcp
ufw allow 25565:25600/tcp
ufw allow 25565:25600/udp
ufw enable
Note that the rule for port 22/tcp (SSH) is only to maintain your remote administration access to the VPS, and is not required for Pterodactyl itself to function.
If your provider also applies an external network firewall, open the same ports in its customer panel.
Option B: equivalent configuration with iptables
If your distribution does not use UFW, you can apply these rules directly with iptables:
iptables -A INPUT -p tcp --dport 22 -j ACCEPT
iptables -A INPUT -p tcp --dport 80 -j ACCEPT
iptables -A INPUT -p tcp --dport 443 -j ACCEPT
iptables -A INPUT -p tcp --dport 8080 -j ACCEPT
iptables -A INPUT -p tcp --dport 2022 -j ACCEPT
iptables -A INPUT -p tcp --dport 25565:25600 -j ACCEPT
iptables -A INPUT -p udp --dport 25565:25600 -j ACCEPT
Similarly, the rule for port 22/tcp is only to keep your administrative SSH access (the default port is 22, but make sure to adapt it if you have changed it).
Remember to persist your iptables rules according to your distribution, otherwise they may disappear after a reboot.
Final checks
Before creating your first game server, check the service status:
systemctl status nginx php8.3-fpm mariadb redis-server pteroq wings --no-pager
Also check that the expected ports are listening:
ss -ltnp | grep -E ':(80|443|8080|2022) '
Finally, in the panel, go back to your node. If Wings communicates correctly with the Panel, you will be able to create a server and assign an available allocation to it.
Example: create a Minecraft server in Pterodactyl
Once the Panel, Wings, and allocations are in place, the clearest test is to create a first Minecraft server. In the Pterodactyl administration area, go to Admin > Servers > Create New.
Start with the general information: server name, owner, target node, and primary allocation. For a simple test, use a single allocation, for example port 25565, then keep Start Server when Installed enabled if you want the server to start automatically after installation.

Then fill in the application limits and container resources. For a small test Paper server, a reasonable base can be:
- Database Limit set to
0if you do not plan to use an external database. - Allocation Limit set to
1if the server only needs one port. - Backup Limit set to
2to allow a few backups. - CPU Limit set to
100to limit the server to one logical core. - Memory set to
2048MiB for a comfortable test. - Swap set to
0to disable container swap. - Disk Space set to
8192MiB to give the server 8 GB.

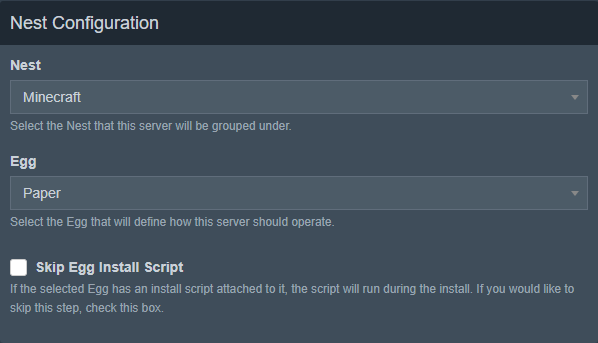
In Nest Configuration, choose the Minecraft nest, then the egg you want to use. In this example, we use Paper, because it is a common choice for an optimized Minecraft server with plugins.
For the Docker image, pay close attention to the Java version. With latest, recent Minecraft versions may require Java 25. For example, Paper for Minecraft 26.1 requires Java 25, so the ghcr.io/pterodactyl/yolks:java_21 image can cause startup to crash. For a latest server, choose Java 25 or pin a Minecraft version compatible with the selected Java image.

In Startup Configuration, keep the startup command generated by the egg, then check the variables:
- Minecraft Version:
latestfor the latest version, or a precise version if you want to avoid surprises. - Server Jar File:
server.jar. - Build Number:
latestfor the latest Paper build.

Then click Create Server. The server first appears as installing, then switches to Active when Wings has finished downloading and preparing the files.

Finally, open the user view for the server. The console lets you start, restart, or stop the server, follow Minecraft logs, and monitor CPU/RAM/network usage. After switching to Java 25, the Paper server should start correctly if the allocation and ports are consistent.

If the server stays stuck or immediately goes offline again, open the console logs. Common causes include a Java image that is incompatible with the selected Minecraft version, a port already in use, an incorrect allocation, or a Minecraft EULA that must be accepted depending on the egg and version used.
Advanced Wings settings to know
Once your node is working, you can adjust some advanced settings in /etc/pterodactyl/config.yml:
- private Docker registries to authenticate to a private registry.
- network name and network_mode to customize the container network.
- container_pid_limit to limit the number of processes inside a container.
- throttles to control log volume or the intensity of certain operations.
- installer_limits to cap resources used during installations.
These settings are powerful, but a bad configuration can break the node. Change them only if you understand exactly what they do.
Common mistakes to avoid
Here are the issues most often encountered during this type of installation:
composerseems stuck as root: rerun the command withCOMPOSER_ALLOW_SUPERUSER=1.No application encryption key has been specified: check that.envexists and rerunphp artisan key:generate --force.- the Panel generates bad links: check that
APP_URLcontainshttps://orhttp://. - Wings does not contact the Panel: check
remoteinconfig.yml, port 8080, the firewall, and the node HTTP/HTTPS choice. - the Minecraft server crashes immediately on startup: check that the Java Docker image matches the requested Minecraft version, for example Java 25 for recent versions with
latest. - servers are not reachable: check allocations, open ports, and the public IP in use.
Update Wings later
Updating Wings is quick. It is recommended to keep a version consistent with the Panel version. For a Pterodactyl 1.12.x installation, the expected branch is Wings 1.12.x.
Update command:
systemctl stop wings
curl -L -o /usr/local/bin/wings "https://github.com/pterodactyl/wings/releases/latest/download/wings_linux_$([[ "$(uname -m)" == "x86_64" ]] && echo "amd64" || echo "arm64")"
chmod u+x /usr/local/bin/wings
systemctl restart wings
systemctl status wings --no-pager
Best practices for a clean installation
To finish, here are the recommendations we apply at BoxToPlay to get a stable deployment on VPS hosting:
- clearly separate the Panel and the node if your load increases.
- use valid SSL certificates for both the Panel and Wings.
- back up the database and the
.envfile. - keep an external copy of APP_KEY.
- configure the firewall correctly by following step 13.
- avoid advanced Docker network changes unless there is a real need.
- test Wings in debug mode before enabling the final service.
If you are looking for a reliable environment to deploy this type of stack on a VPS server, BoxToPlay focuses on solid performance and a clean onboarding experience. You can launch your server for free.